Evaluating Our Own Recordings

During our time in the recording studio we have experimented with recording several instruments, using a variety of recording techniques. Some of our techniques could be compared to the way Thriller was recorded, as both of the recordings were made in an insulated, well equipped recording studio. One obvious difference would be that Thriller was recorded back in the 1980's, whereas we recorded in 2015 so the technology has improved massively. This development has allowed us to record with a similar quality to Swedien's work, but with a lot less effort and knowledge.
Sound Quality
Whilst planning our recording we had to consider many different factors. First of all sound quality, this includes accurate, enjoyable and intelligible sounds coming from an audio output form an electronic device. We ensured this by setting up the microphones properly and choosing the appropriate type for the selected instrument and also doing sound checks before the actual recording. When we completed a sound check for the glockenspiel, we realized that there was too much sound. Because of this we knew that for the actual recording we needed to place the mic further away.
Acoustic Reflection
Acoustic reflection was another important aspect to look into, especially whilst recording in a studio. Our studio at school has insulated walls, this soundproofs the studio by stopping the transfer of sound passing from one space to another with the use of materials which prevent the sound passing by absorbing the energy or the sound wave. In turn, this influences the acoustic reflection as sound is more likely to bounce back therefore giving more repititions of sound from the reflection of sound waves. Another advantage of having a sound proofed studio, is that it reduces the background noise. This is necessary in our studio, because it is located in a school so loads of people are around making noise plus you'd have other unwanted noises like air-conditioning. When Micheal Jackson was recording Thriller, he probably didn't have much unwanted sound around the studio, but soundproofing was still required to ensure high quality sounds.
Resonance
Whilst recording vocal in the School's studio resonance was not a factor we considered, but is something that we would prioritize in future projects as it makes the recording sound very professional. Resonance is extremely noticeable over the album Thriller, especially in vocals. With improved resonance intensifies and prolongs sound. We could achieve this by using condenser mics for vocals which pick up high frequency sounds, or an effect could be applied to tracks digitally.
Roles and Responsibilities
I worked in a group of 3 to complete these recordings, so we managed to switch around the roles a little so we all got the chance to do something new. For the glockenspiel, Lewis and I recorded Ryan playing the instrument, whereas for the guitar recording Lewis played guitar so me and Ryan recorded him. For the vocal recording I worked with Dan and Jon, Jon set up the studio and Dan recorded me singing vocals. Assigning roles for individuals helped us achieve a professional recording as we could focus on one job, this compares to the recording of Thriller because everyone could specialize with their own roles.
In the groups I worked with the group dynamics were extremely good as we all seemed to have different talents. This allowed us to develop existing skill and learn new skills by helping each other out.
Related to Thriller...
The recordings we completed in school were only short, and mostly only included one instrument. This makes it a bit difficult for us to compare it to Thriller, as for the album he used over 24 tracks on each song. Another aspect of studio recording could be from the recording I did in the Summer at Ambitious Recording Studio's in Birmingham.
Tracks recorded at Ambitious:
Yours-
https://soundcloud.com/user-804953953/yours-ella-henderson-cover-sung-by-lauren-thomas
Valerie-
https://soundcloud.com/user-804953953/valerie-acoustic-cover-by-lauren-thomas-originally-by-amy-whinehouse
Love is a Loosing Game-
https://soundcloud.com/user-804953953/love-is-a-loosing-game-cover-by-lauren-thomas-originally-by-amy-whinehouse
At ambitious I recorded 6 tracks, but instead I used a backing track and then recorded my vocals on top of the track. I used a similar technique to Michael as he also recorded his voice over the tracks produced by the instruments. But instead, Michael's 'backing track' was produced especially for him. Some other artists would record vocals whilst the instruments were also recording theirs. This is a good method as it involves the listener more, especially if the tracks are being recorded in stereo. Stereo recordings give the listener a better sense of instruments and almost sounds like a natural or live performance. Thriller was also recorded in stereo, but tracks were recorded separately. The majority of recordings are recorded in stereo, but stereo was only introduced in 1958. Quincey Jones recorded on of the first stereo albums- The Genius of Ray Charles, in Phil Ramones studio on 48th Street.
The recording of these tracks are of a high sound quality as I worked with a profession sound engineer who has studied sound production for many years. He set up a condenser microphone, with a pop shield and a pop filter, this allowed my vocals to be recorded professionally and of a high quality. The room which I recorded in was similar to the School's studio, but a lot bigger. This difference gave a different sound, as the room size effected the way sound vibrates off surfaces and also sound reflection as sound had further to travel before being absorbed.
The Recordings
Final Studio Recordings
Electric Guitar

To begin with my group recorded 3 electric guitars, we chose to record 3 so that everyone had a chance at working in the control room and setting up the studio. All 3 of these recordings took place in the studio as we believed that this would give the best result as all of the equipment was already in the room.
We used a Shure SM58 microphone, this is a dynamic, cardioid mic. This was our choice as we know it produces clean sounds from amplified acoustic instruments. Shure is a very popular, established brand for microphones and they have a very good reputation.
In this recording, the sound quality was good as we recorded in a studio using professional equipment (cubase, macs, soundproof walls, amps and many more), We eliminated background noise by using the studio to record in, which has been soundproofed.
https://soundcloud.com/user-804953953/sets/electric-guitar-x3-studio
Name of microphone- Shure SM57.
Type of microphone- Dynamic.
Polar Pattern- Cardioid.
Position/Distance- 10-15cm away from the amp.
Location- Studio.
Performers: Jake, Riess and Dan.
 |
AKG
C100S |
Trumpet
Next we decided to record a brass instrument, we chose the trumpet. This was a lot different than recording the guitar as the sound produced by the trumpet was not amplified before entering the diaphragm. This meant that we had a lot less control of the sound being produced, as the output wasn't controlled by an amp.
Overall the recording that we produced is of high sound quality. I believe that we achieved the natural sound that we were aiming for. But sometimes the sound was 'piercing', this may be because we used a condenser mic. Evaluating our recording, I would suggest using a ribbon mic in the future to give the 'full natural sound'. Alternatively we could have used a combination of a ribbon mic and condenser mic, as then you would have the best of both worlds- the full natural sound from the ribbon, but the brightness and sparkle from the condenser. Although the condenser mic worked quite well in the majority of the recording.
With brass instruments, sound comes directly from the bell, unlike some wind instruments where sound comes from the holes too. Because of this, it was necessary for us to position the microphone near to the bell of the trumpet. The ideal distance for the microphone would be about 4-6ft away from the instrument, this helps to capture room sound as well as just the trumpet alone.
In the future to variate/experiment with the recordings we could ask the performer to play with a mute in. This would change the sound even more. Also we could record in a different room, for example a stairway as this would drastically change the acoustics of the room and the acoustic reflection.
https://soundcloud.com/user-804953953/trumpet-studio
Name of microphone- AKG C1000S.
Type of microphone- Condenser.
Polar Pattern- Cardioid and Hyper Cardioid.
Position/Distance- 10-15cm away from the trumpet's bell.
Location- Studio.
Performers: Sarah Hambly.
Piano
 |
| The Spaced Pair Technique |
With recording the piano, it was important that we were able to get the whole sound of the piano. We achieved this by using the 'Spaced Pair' technique. We wanted to achieve a stereo using 2 microphones, rather than just 1 stereo microphone, because during my research for the 'Thriller' blog post, I discovered that famous sound engineer, Bruce Swedien, preferred to use 2 rather than just the 1. This involves using 2 cardioid microphones to create a pair, which we placed about 4 ft away from each other either sides of the length of the piano. By doing this we could collect the full sound of the piano. We used an electric piano, this helped us as it was a lot easier to set up the mics for recording. But, if we would have used an acoustic piano then we could have placed the microphones above an opened panel and collected sound this way. I believe that this instrument would have created a lot more resonance and acoustic reflection, which adds emotion to the playing and involves the listener more.
To begin with, we had planned to use the 'X Y pair' technique, but this turned out to be awkward when put into practice as the performers head was in the way.
Name of microphone- AKG C1000S.
Type of microphone- Condenser.
Polar Pattern- Cardioid and Hyper Cardioid.
Position/distance- In a spaced pair, 10-15cm away from the piano's output (speakers).
Location- Studio.
Performers: Sarah Hambly.
 |
Samson
C01 |
Vocals
To record vocals we used a good condenser microphone. We chose to use this microphone as it is a cardioid condenser microphone with a large diaphragm. The size of the diaphragm is extremely important as it effects the natural noise, SPL, frequency range and sensitivity and also dynamic range of the microphone. A large diaphragm is more sensitive to sound frequencies, this makes it a perfect choice for vocals as it can pick up the natural sound.
Name of microphone- Samson C01.
Type of microphone- Condenser.
Polar Pattern- Cardioid.
Position/distance- 10cm away from the singer.
Location- Studio.
Performers: Sarah Hambly and Lauren Thomas.
Evaluating Practice Recordings
Glockenspiel
 Zoom H2 Handheld Recorder (90 deg, 120 deg, 2 channel, 4 channel)
Using the H2 handy recorded was extremely different to use than most other equipment we have in the studio, it is a very small, easy to use, portable recording system. This microphone is able to record 4 different settings, similar to some polar patterns:
90 degree front recordings- This mode is recommended to record solo vocals or solo instruments. This setting records in stereo.
 |
Cardioid Polar Pattern
(Similar to the 120 deg setting). |
- 120 degree rear recordings- This mode is great for capturing the ambiance of the venue/location. This setting records in stereo.
|
Cardioid Polar Patter
(Similar to the 90 deg setting). |
- 2 Channel recordings- This mode uses the front and rear mics simultaneously, and records in 2 channels.
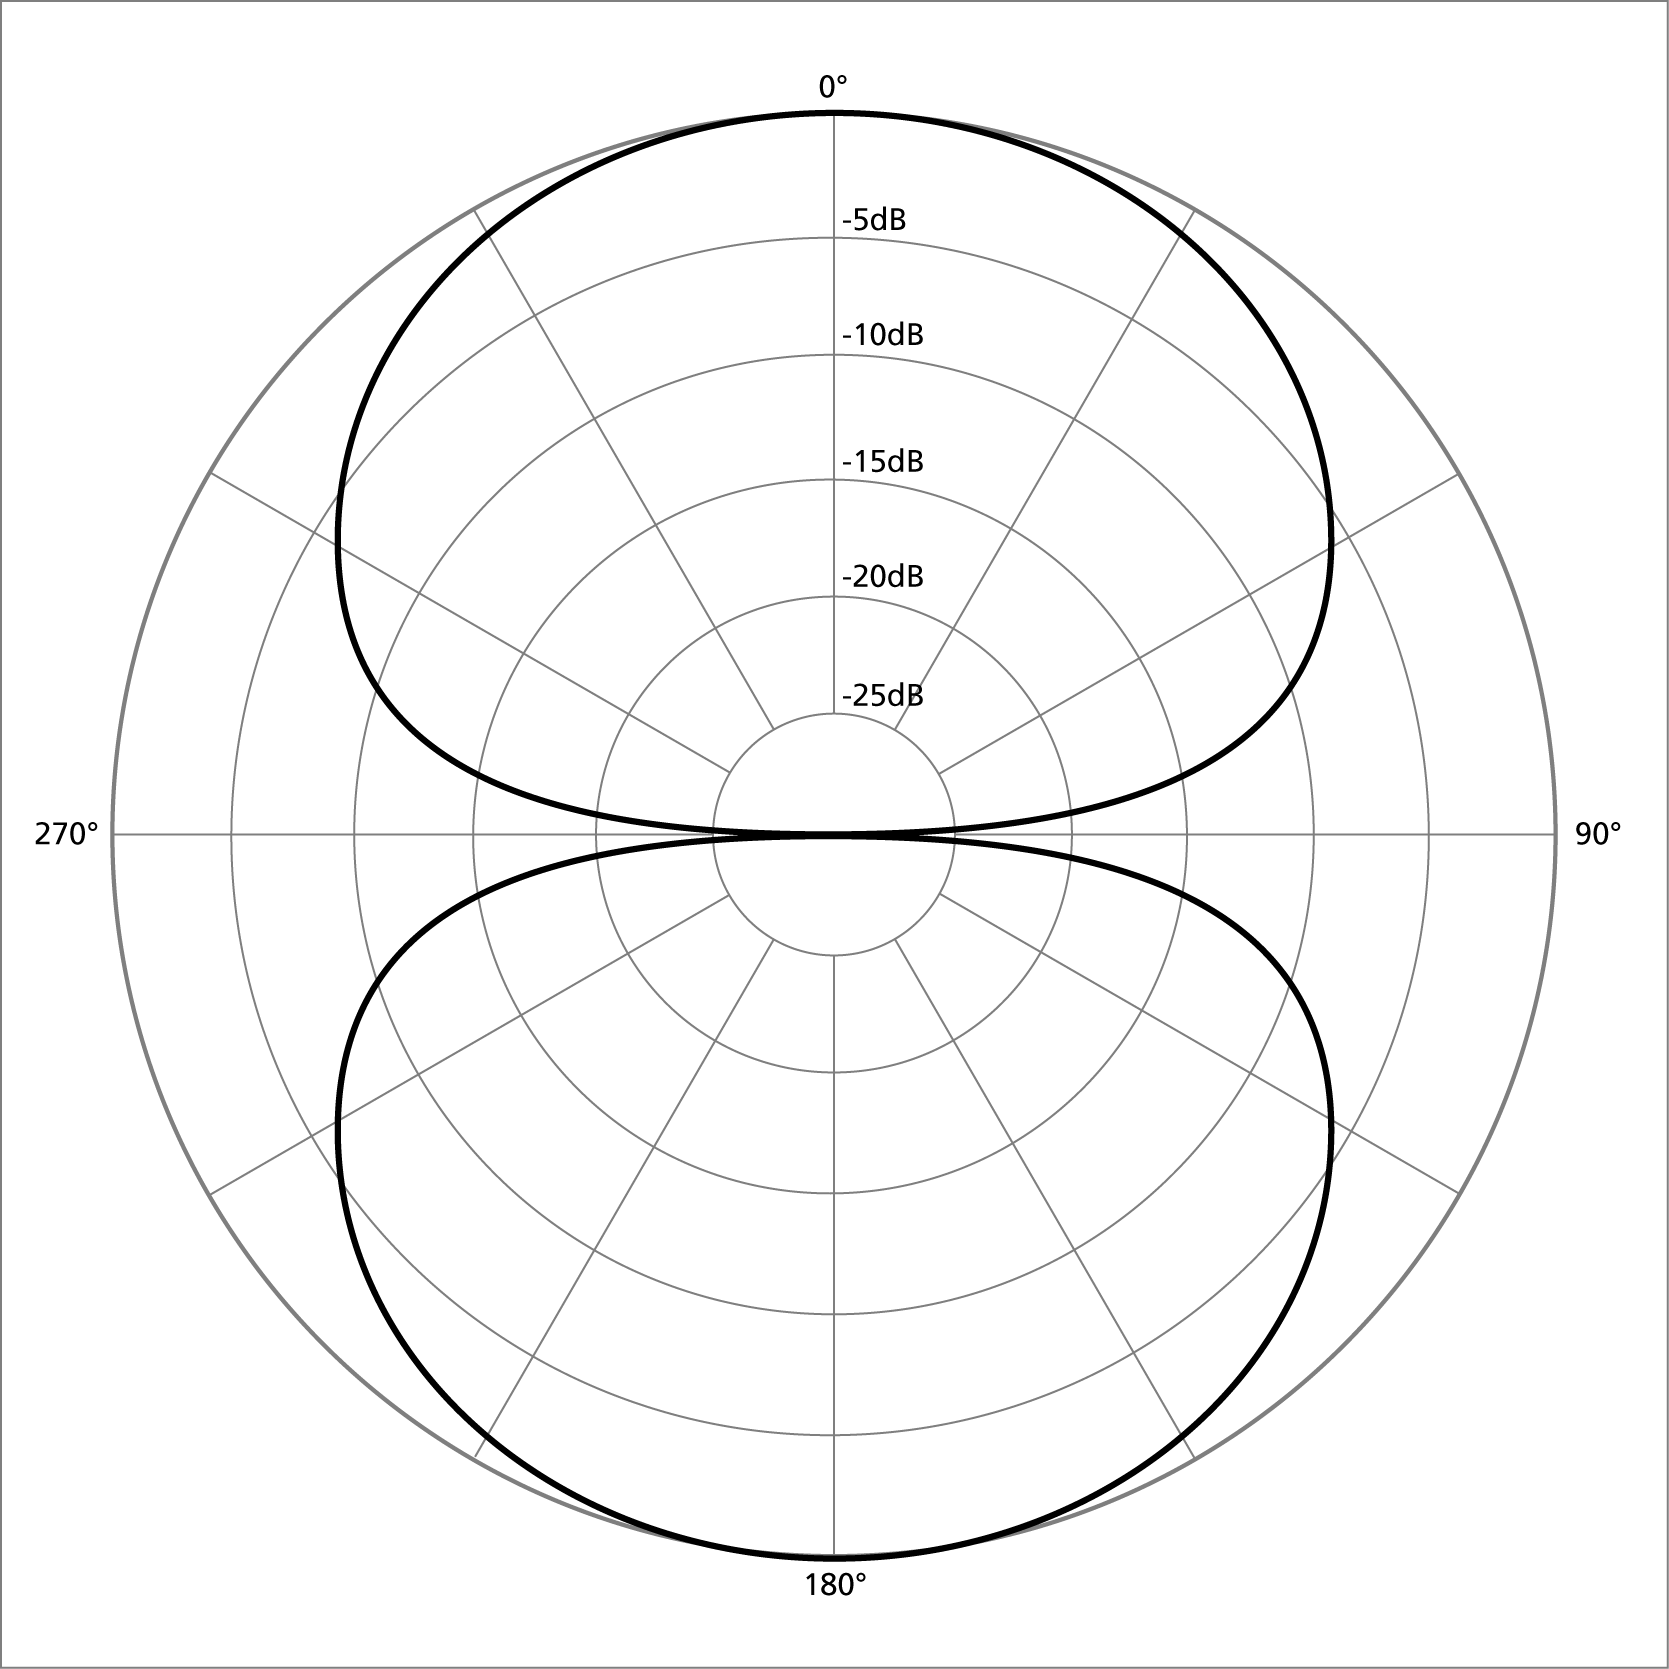 |
Figure of 8 Polar Pattern
(Similar to the 2 Channel setting). |
- 4 Channel recordings- This mode also uses the front and rear mics, but instead records in 4 channels. Perfect for recording in a concert as not only can you capture the music from the performance, but also the audiences reaction.
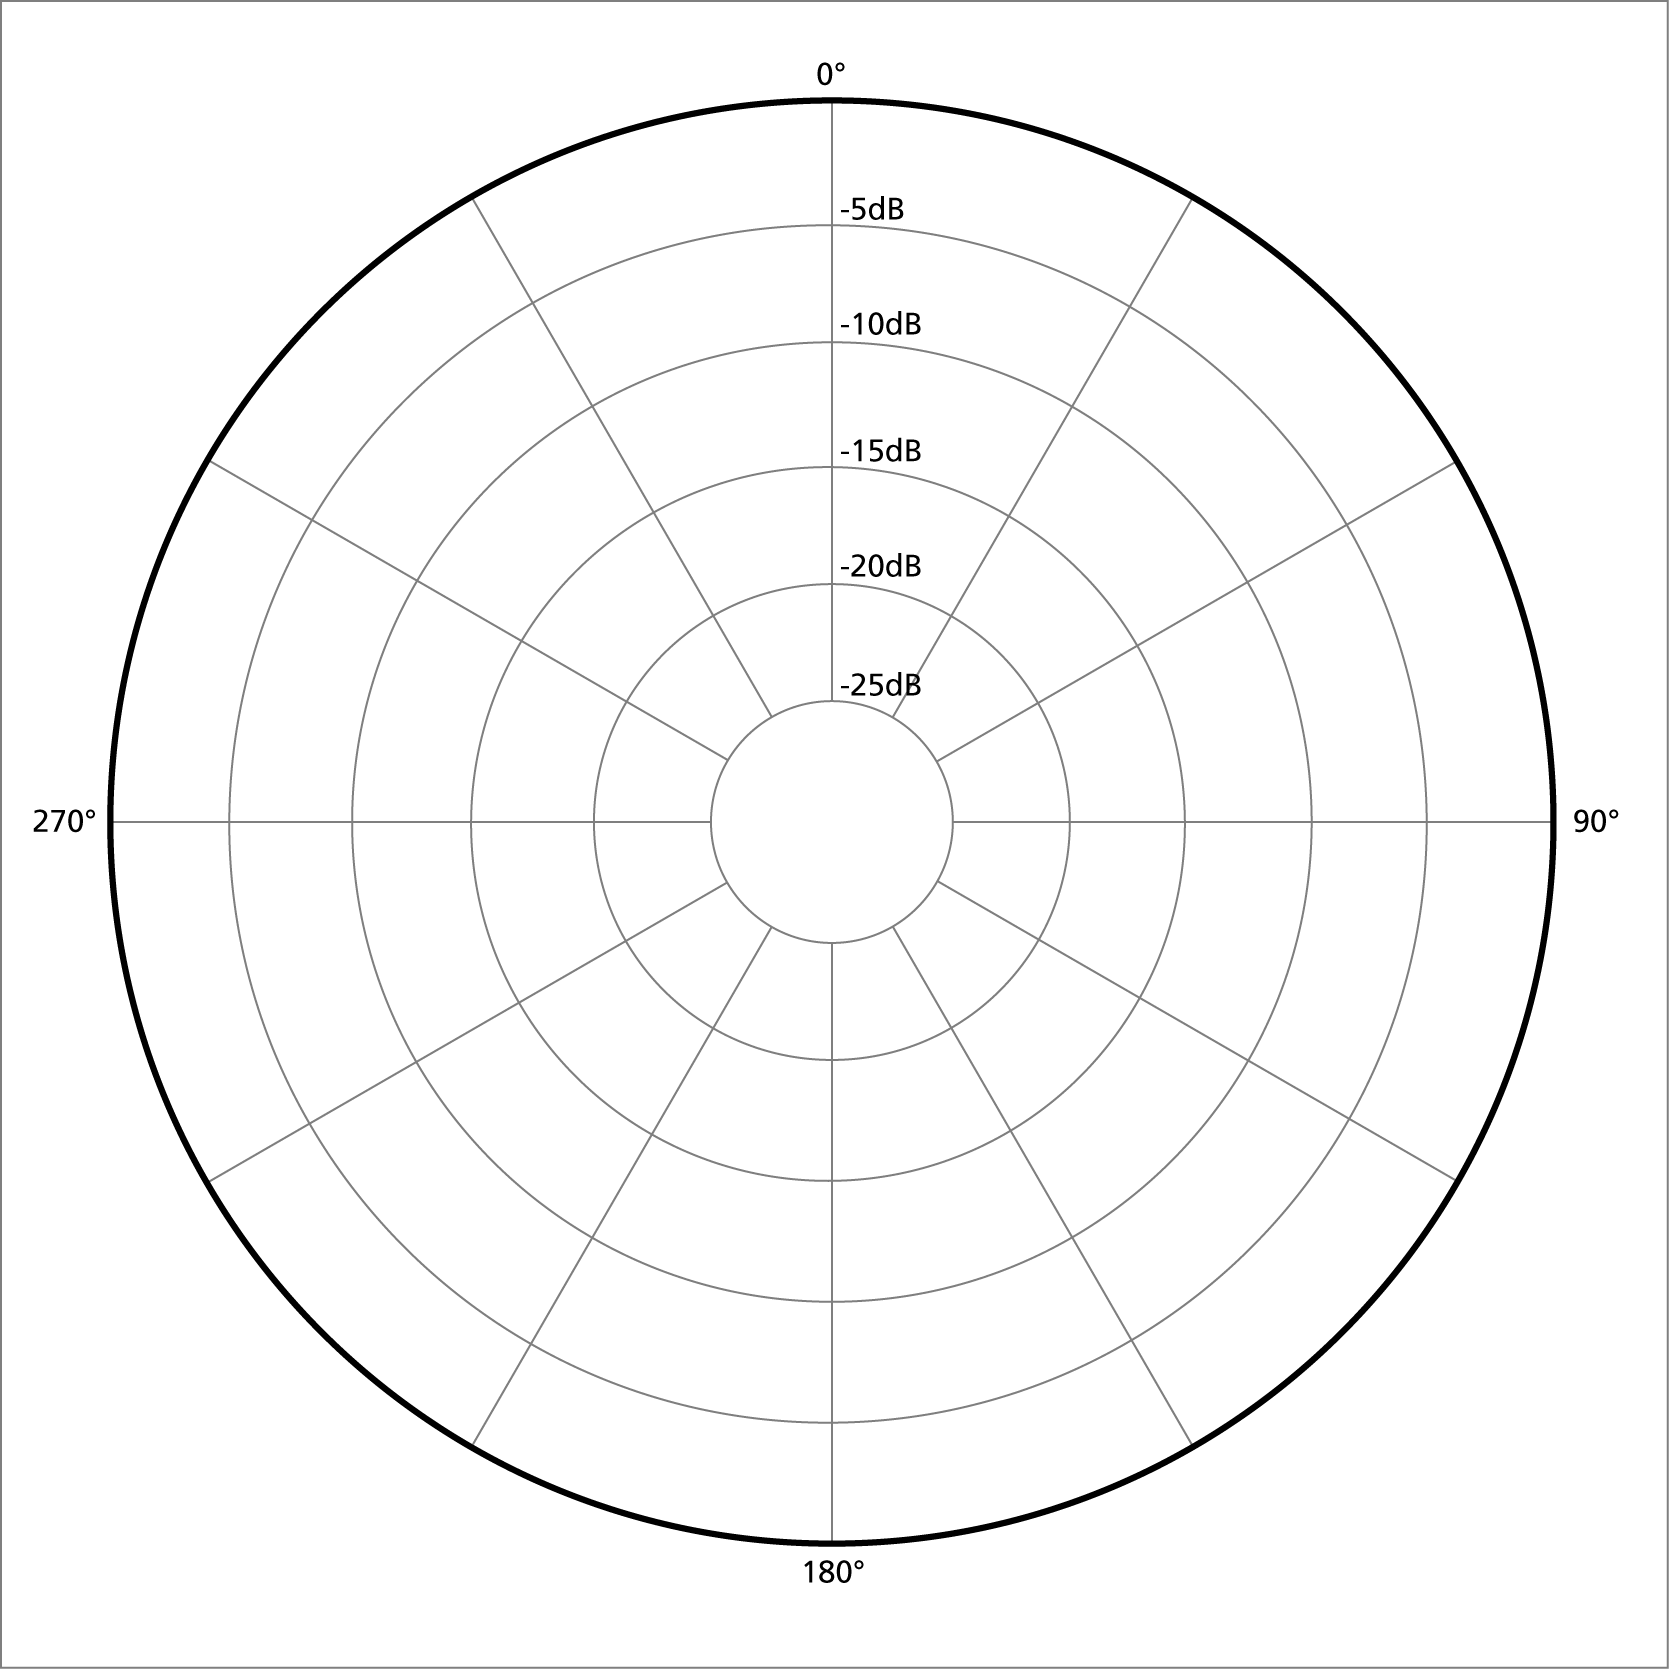 |
Omnidirectional Polar Pattern
(Similar to the 4 Channel setting). |
To make the most out of its portable property, we carried out recordings outside.
The recordings that we made were took on a very windy day. this increased the amount of background noise in the piece. We could have decreased the noise by placing a pop shield around the microphone or used temporary sound wall around the area.
The 90 degree setting picked up a smaller area then the 120 degree setting, you can tell this in the recordings as the 120 degree setting picks up more background noise. Overall we discovered that the 120 degree setting worked better if you wanted to record sound from a wider area or if you were making an ambient recording. But if, for example, you were recording one instrument and you were close to the source then the 90 degree setting would be a good idea.
With using the 2 channels and the 4 channels we had a stereo set up. This gave us a natural feel to the recording as more tracks were available. When recording in stereo, it is important to ensure that when you listen back to the track you are using speakers/headphones of high quality, to achieve the best result.
To improve our recordings even more, we could chose a better place/time to record. The place itself was absolutely fine, but as we were in school some people were walking past so you can hear a bit of speaking on some of our recordings.
Studio
Recording in the studio gave us a whole different experience to using the handy recorder. Before we had done any work, we had already elimiated the chance of background noise. This is because the studio we use at school is soundproofed. This is very useful as it decreased sound absorption, but increased sound reflection. In turn this gives us a natural sound with resonance and maybe even some reverb depending on the acoustics of the room.
https://soundcloud.com/user-804953953/sets/glockenspiel-studio
AKG C1000S
The AKG C1000S is a condenser microphone with a small diaphragm, it can be used for a lot of different set ups which makes it the ideal mic to have in a studio. This mic normally uses phantom power (how we used it), but can also be powered by batteries, making the mic wireless. This mic also has a bass cut off feature, that we didn't have to use for this recording as we were recording a glockenspiel, and can also change from cardioid to hyper cardioid.
Compared to using the H2 Handy Recorder, this recording is much better as the acoustics of the instrument are captured a lot better and the sound quality is good. This is a similar technique to what would be carried out professionally, and the recording equipment that we used is of professional standard too.
Shure SM58
The Shure SM58, also known as 'the legendary vocal microphone' is a cardioid condenser microphone which is well known for its clear reproduction of clear, warm vocals. We chose to use this to record the glockenspiel to see whether the 'vocal' mic was just for vocals.
Personally, I really liked the outcome of this recording as there was hardly any background noise and sound was very clear. To improve in the future, we could set two of the microphones up in an X-Y pair formation.
AKG D112
The AKG D112 is a very poplar mic which is well known for its ability to handle up to 160dB SPL without any distortion. Most of the time this mic is used to record the bass drum, as we were only recording the Glockenspiel we didn't have to worry much about the recording coming out too bassy.
We found that using this for the Glockenspiel gave us a very accurate replication of the original sound. This was due to the diaphragm having a very low resonance frequency, this helps to maintain a solid but powerful sound from all frequencies under 100Hz.
In the future, I don't think that the AKG D112 would be a great choice to record the Glockenspiel with. Instead I believe this mic would be great to record instruments with high pressure levels and a lot of bass, like the trombone or the kick drum.
Guitar (Studio)
AKG C1000S

This mic worked well with the acoustic guitar as it picked up many of the high and low frequency sounds. This gave the recording a natural feel and the sound produced was of very high quality. This mic has two options for the polar -pattern and frequency response: cardioid or hyper cardioid. We recorded the guitar using the cardioid setting, but in future I think that we should record in both of the settings and then compare the two.
Shure SM58

The Shure SM58 picked up more lower frequencies that the AKG C1000S. This gave the end recording a different sound and a wider range of the guitar was picked up, which was very beneficial as the guitar does have a very dynamic and wide range.
As this mic is dynamic, we knew that it could withstand higher sound levels. Because of this we were able to position the mic a bit closer to the guitar that we could with the AKG C1000S, which is a condenser microphone.
AKG D112

I mentioned earlier that the AKG D112 was a good mic for recording instrument with high SPL and lower frequencies. This wouldn't be very useful for the guitar as although it does play some low notes, its range is spread out so the microphone would need to have the ability to be able to pick up a more diverse range of frequencies.
This recording was good though as the microphone could withstand high levels of sound.
Using the AKG C1000S in different locations.
AKG C1000S
This mic worked well with the acoustic guitar as it picked up many of the high and low frequency sounds. This gave the recording a natural feel and the sound produced was of very high quality. This mic has two options for the polar -pattern and frequency response: cardioid or hyper cardioid. We recorded the guitar using the cardioid setting, but in future I think that we should record in both of the settings and then compare the two.
Studio Recording
Presentation Suite Recording